Pages

Showing posts with label distess inks. Show all posts

Wednesday, November 9, 2016

Monster squad

Hey there,

I am at Jane's Doodles blog with these super cute monsters from Monster Squad set.


I just masked left and right sides of an a2 card base to make the light beam. I sponged distress inks very lightly to define the beam. I also stamped various sentiments from the same set to add some interest to the background. I splattered various distress inks on 3 pcs of paper, stamped monsters , fussy cut and added those popping eye balls. 

Thank you for being here. Have a nice day!


Wednesday, November 2, 2016

Guest DT @ diecuts and more

Hey friends,

I guest designed for Die Cuts And More. They have introduced two step stencils which I find very interesting. I am posting the cards here but you have to check their blog HERE for loads of more inspirations. There are many possibilities with these 2 step stencils and I have explored qite a few on the blog. Please check out there.


Thanks for visiting me here. I hope you will try these awesome stencils!


Guest DT post @ Crafty Milka

Hello friends,

I made this card few days back for my dear friend Milka's blog. I couldn't post here because of blogger issues. I made it as an inspiration for her I love math challenge #3


Here is the inspiration board!


My Card:


Please check her blog HERE for more information on the challenge and my design process for this card. There is still time to play along (It ends 7th Nov.) .

So give your crafty brain a workout and create something fabulous.
Thanks so much for being here !


Friday, October 21, 2016

Brutus Monroe embossing powder

Hello friend ,

I am on The Craft Shop blog with my DT post. I am showcasing Brutus Monero embossing powder and Jillibean stamp sets. Please check the blog HERE to see what I created.


See you there!


Friday, August 21, 2015

Rakhi Cards

Hey Friends,

Popping here for  a quick post today. I wanted to share Rakhi cards I made this year. 
Here goes the first one.


I applied squeezed lemon distress ink on white CS. Added stencilled triangle with mustard seed ink. Emboss some more triangles in gold with WPlus9 stamp. Added sentiment and some bling.

For the second card, I used Altenew cityscape stamp on Papertrey ink pattern paper. I stamped the same stamp on a white panel & coloured the top with distress inks & stamp the sentiment. 


Align and adhere the ready panel on card base.

Third card is very simple. All stamps an dies are from Papertrey Ink. Added some pattern paper and silver glitter border on the edge.


Hope you like the cards. I will be back soon...keep crafting. Hugs.


Monday, May 11, 2015

Penny Black... love continues...

Hello Friends,


I Am back with more Penny Black stamps. This time I am using their photo polymer clear stamp set 'Sprigs'. There are various twigs and branches in the set which we can use as a focal point  or to create backgrounds. They are great as silhouette too. They are very good quality stamps which takes all inks pretty well. 

Card : 1


This is totally inspired by Jill's card HERE. I don't remember how many times I have seen that video. Her ease with water colors is amazing.

Ok, back to my card... 

1.Paint the background- slope, sky- with various distress inks. Let it dry.

2. Ink the stamp with 2-3 shades of yellow distress inks. Add brown color to trunk & branches. You can use distress ink with brush, distress markers or any water based marker. I have use tombow markers as I don't own any distress markers. Spritz the stamp with water and stamp on the dry background.

3. At this point you can manipulate your image with thin paint bush and distress inks. Add more colour to trunk and blooms for some dimension. Let it dry.

4. I used hero art's stamp (Woodland leaves and grass- one of my first stamps. ) for those bare trees in the background - it will add depth to the scene.

5. Add some birds and sentiment. I love this quote stamp by Verve stamp. Yup, no one's life is perfect - just like my card... ;) ...hope you will find it wonderful though!


Card : 2

They says inpiration is everywhere. In this case, I was inspired by a lid of Versafine Ink pad.


And here is my take on the inspiration.


1. I chose the Kaisercraft sentiment as it is very bold and will give good contrast.

2. Select a die which will frame the sentiment well. Cut a copy paper with same die for a mask.

3. Deboss the center of cs panel with the same die. 

4. Mask the center with die cut paper. Stamp images around it with various inks. Just make sure you space them out evenly .
 

5. Remove the mask and stamp sentiment.


Card : 3


Here, I have tried 'Layered Batik Resist' technique. I was inspired by very talented Dina Kowal's tutorial here. She is the queen of various techniques and an awesome artist. I even own few Impression Obsession stamps designed by her.  I followed exact same steps but with distress inks. Make sure you allow each layer of ink to dry thoroughly, before adding embossing powder.   


Card : 4


  Last year I took one of the Online Card Classes to learn how to use pattern paper. Yes, I get confused when i have to use pp. I love them but never can use effectively. I used Penny Black pattern paper - Painted Blooms .

1. I clear embossed one of the image on a piece of pp. Apply distress inks in shades of blue. The embossed part will resist the ink. 


2. Sandwich pp between folded copy paper and heat it with mini craft iron to remove the clear embossing. Now, you have your own, altered pp. The patterns peeking through the stamped image is just magical.

3. Add twine, butterfly charm and sentiment to finish off.


Card : 5


I love this sentiment from 'Heartfelt' set - and designed the card around it. I used different shades of grey to capture  essence of the sentiment. Add some butterflies and blings to give finishing touch.


Card : 6


1. Cut the white cs panel with mft Polaroid frame dies and emboss it.

2. Place the panel on card base & mark the position of windows. Remove the panel and stmap various images with choice of your inks. I have used distress inks and tombow markers for the same.

3. Adhear the panel on card base & add die cut frames .

4. For the glitter boarder, stick red double sided tape on the base, pour some glitter, burnish with finger, tap off excess glitter. Add the sentiment.


Card : 7


I have created night scene with them here. They are detailed and delicate so even if you use as silhouette, they won't overpower the scene.


  Background is created with distress inks and masking. Silhouettes are stamped with some grey and black inks. (you can do first and second generation stamping with just black inks too). Moon is winked** with clear wink of stella glitter pen. 


Card : 8


This last one is my favourite one. I always like to mix florals and geometrics.


1. Cut a circle form a colored cs. Stamp stripes in black. Let it dry thoroughly.

2. Rub some anti static powder. Stamp & emboss floral image in gold.

3. Emboss sentiment in copper, add ribbon and pop the circle with foam tape.

Close Up:


These stamps are good as fillers too. Combine them with you favorite floral stamp to make a bouquet. I wanted to try it but ran out of time. Please share if you do that. Let me know how you like this 'one set many looks' series.

 Keep crafting...keep sharing....! 


Wednesday, April 15, 2015

Using stamp & stencil duo

Hello Friends,

This is my first post as a Crafter's Corner DT and I am super excited to be here. 
For next few posts I will be working with Penny Black brand of products. These products are of very superior quality. Their design team is very talented too. By following them I have learnt a lot. My cards are heavily inspired by Jill Foster's work. The way she uses products and water colours is just amazing. 

They have this combo of stamp and stencil which i love the most... and why? Well, you will see as we proceed. I am focussing mainly on cling stamp Demure & stencil Floral Spray.


Today, I have five cards and a tag made with same stamps and stencil. I tried to use then in a few different ways to create different looks.  Hope you will like them. Remember , mostly my cards are 5"x7" -this will give you better understanding of stamp and stencil size.


First Card : Made with stencil & stamp 


Many of their cling stamps come with co-coordinating stencils and they are really big and can be used for mixed media too. For this card, I have used memento dye inks for coloring flowers while background is made with distress inks. 

Process :
 

1. Stamp the image with memento black ink on a panel.
2. Lay the coordinating stencil and secure it with washi tape. this will mask the background and you       can colour the flowers without worrying about going out of the line. Isn't that cool?


3. Start applying lightest color of dye ink first with dauber and continue adding darker shades till you      are happy.
4. Add little detail in the corners with another stencil and dye ink.
5. Colour the background with different distress inks. As we have used dye inks(which are permanent     once dry) for flowers it will not bleed into wet background. This makes water coloring so much           easier. Add some more texture with a script stamp once the background is dry.
  

6. To add more interest I used the same stencil & script stamp in the corners of card base too. Mount the panel with 3d foam tape and finish it off with sentiment and few blings.

Card 2: Made with only stencil

For this card I have used Penny Black pattern paper Painted Blooms as a base for stenciling. I am not a huge fan of pattern paper but i specially like this one as the prints are small and many of them are geometric. Floral or big patterns always confuse me...;). I took inspiration from  Jennifer's video for stencilling. 


1. Place stencil on a pattern paper, secure it and blend in Colorbox Frost White  pigment ink with a foam applicator( The best white ink i have used so far). Heat set it.( remember, pigment inks take longer to dry).
2. Place the stencil back on the white flowers and shift it little bit to offset the next layer. Now apply any dye ink with a duaber. This will give beautiful shadow where there is only dye ink. It will blend with white pigment ink and give pastel shading where there is pigment ink.

3. cut a window from a white panel and emboss it using embossing folder. Emboss sentiment on a strip of vellum with copper embossing powder and adhere it on the back of embossed frame. Mount the whole thing on stenciled pattern paper with 3d foam tape. This will give a nice shadow-box kind of effect. Add thin frame of brown cs around window and stick whole thing on card base.  


Card 3: Made with stamp and stencil


I stamped the flowers with versafine black ink and clear emboss it. This will raise the outlines making it easier to colour flowers and prevent bleeding. With a broad bush add thin down blacksoot distress ink on all over the panel and as you go use paper towel to lift off color from flowers. Let it dry. 


I have used koi water colors to colour flowers(coming soon to Crafters Corner). They are very creamy and packed with pigments. 


Create masks by stamping same flowers on copy paper & fussy cutting them. Now, lay the masks on water colored flowers and stamp hero arts news print stamp in soft granite ink. Repeat stamping till the panel is covered. 


Lay the stencil on flowers. Now comes the best part.....:) Stamp any small images or texture through the stencil on flowers. This will give lots of texture and give illusion of layers in a single layer card. I applied little bit of gesso with my finger hear and there. I tore a corner of the panel and mounted on base card and added a sentiment along with silver loose thread. Oh, ya...corner of base is stamped with same flowers and embossed with white powder.

Card 4 : (a2 size card) Made with stamp & stencil.


I have tried no line colouring here. Stamp the image in tea dye distress ink. Add shading with various distress inks.

I have used worn lipstick, picked raspberry and fired bricks inks here. Once it is dry, use stencil to add details and color for branches. Card base is stamped with background stamp in versafine black. Mount the panel with little border of gold foil paper matting. Add a loop of ribbon and enamel dot to finish it off.

Card 5 : Made with only Stamp.


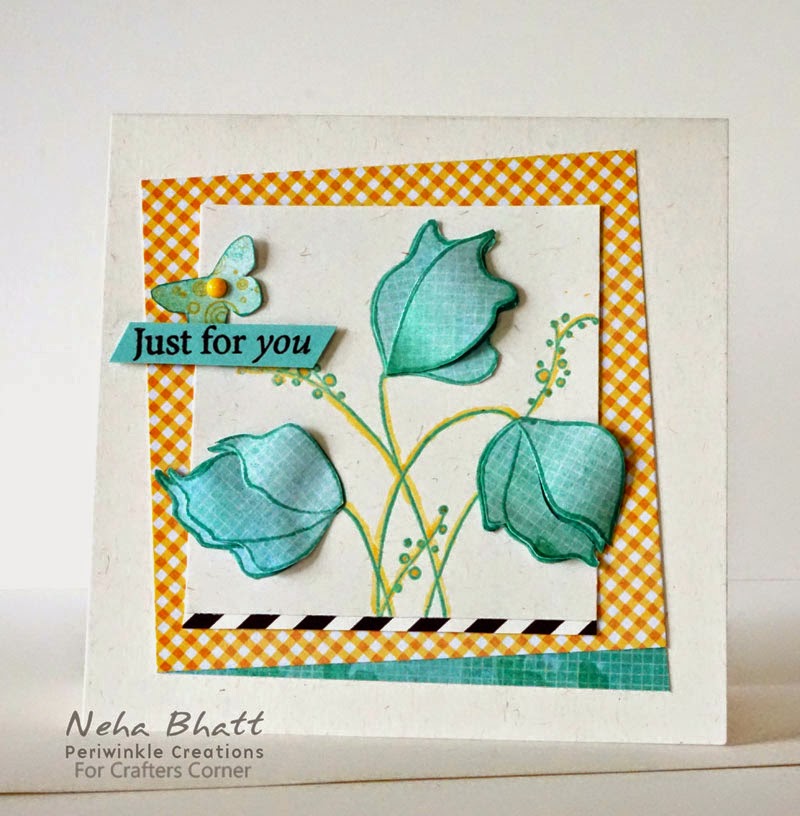
There is lots of stamping and fussy cutting goes in this one. I have used two pattern paper from the pack- one for matting and other for flowers. That greenish blue paper has tiny grids and few butterflies on the side. I fussy cut one of them to embellish the card. 


1. Stamp part of the stamp on a square piece of white cs with colorbox ink - celadon.  Stamp each flower twice(with same ink) on pp and clear emboss them. Fussy cut all the flowers.

 2. Stick one set of flowers on stamped white panel. Check that the panel is little smaller than the image so the two flowers will hang outside the edge which will help to give it some dimension. Now fussy cut the petals form the second set of flowers as shown in the picture above. Curl them by rolling them on paintbrush and adhere them with a dab of glue at the base of petal. You have your popped flowers ready.  See the side view...


Tag : 


I went little crazy with this one. I stamped the background with Mama Elephant Trifecta stamp. Two flowers were stamped with memento black ink. I colored all the triangles within flower's out line  with different colors of markers. I just love that kind of pixilated look it gives.  

Hope you will like it! And if you do....leave comment below!